GoPhish over HTTPS
The article is for informational purposes and is intended for security professionals conducting testing within their organization or contract. The author is not responsible for any harm caused by using the information provided. The use of phishing emails and web resources, theft of credentials and violation of the secrecy of correspondence are punishable by law.
In the article Deploying GoPhish on AWS I explained how to deploy the GoPhish phishing service on an EC2 instance. Today I’ll show you how to additionally set up a connection via HTTPS to the GoPhish admin panel and a phishing domain. To do this, we will use Let’s Encrypt certificates.
For everything to work, you must have a domain to which you need to connect an EC2 instance.
Instance preparation
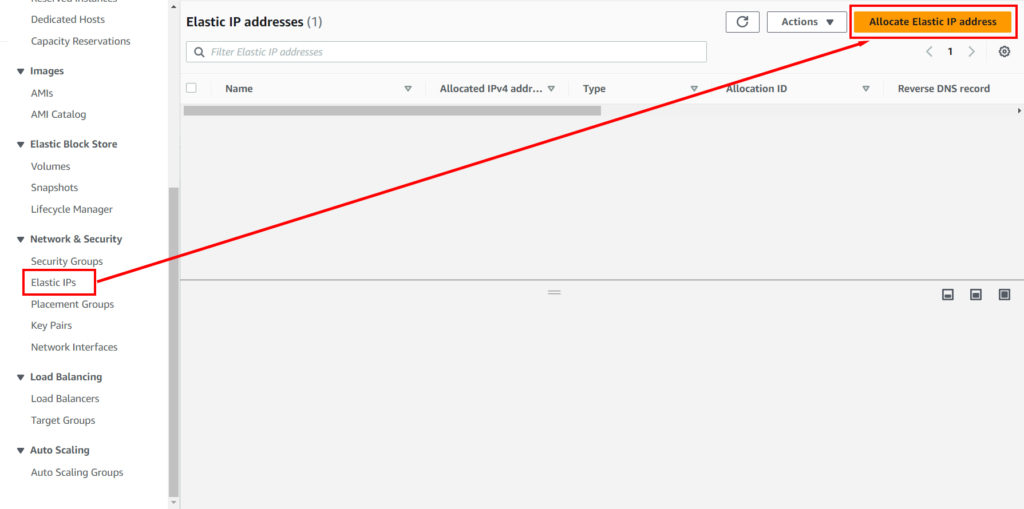
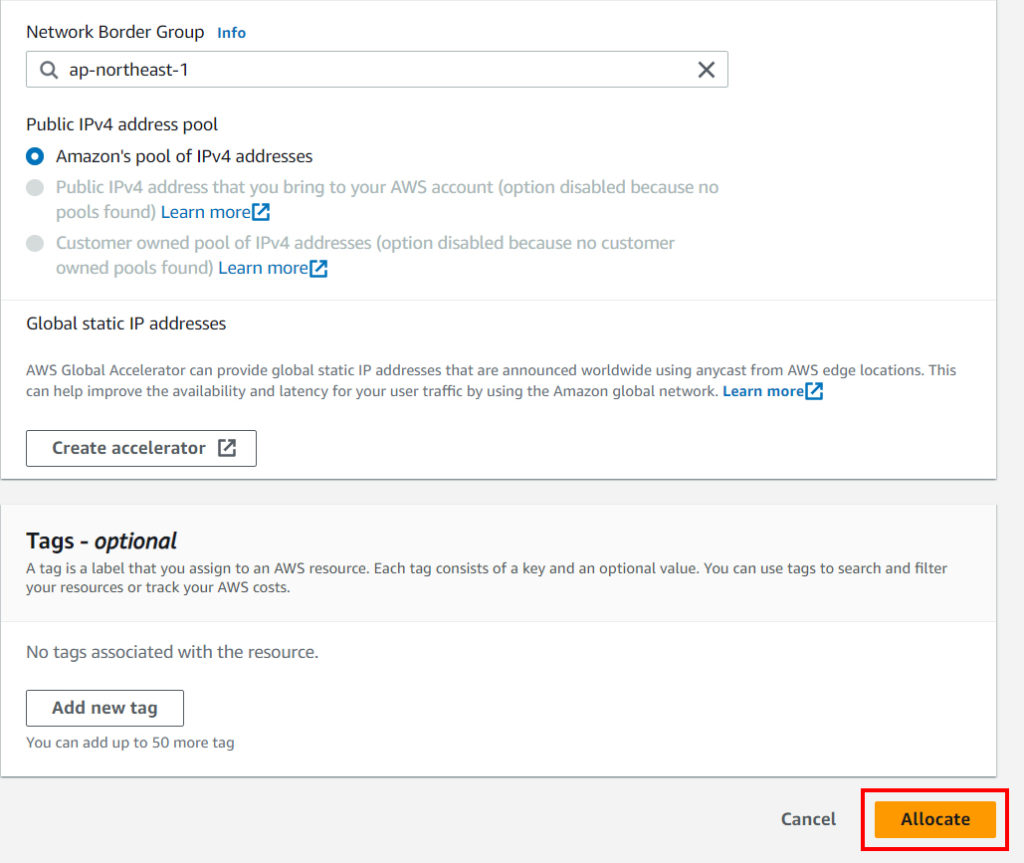
To connect a domain, go to the EC2 console in the Elastic IPs item, then select the Allocate Elastic IP address button.


You will receive a message that you have received a new IP. Now it needs to be bound to your instance. Click on IP in the list and select in the top menu: Action -> Associate address. Then select the instance you need from the list. And click Associate.

To make sure everything went as it should, go to your instance and make sure the Elastic IP address has joined.

After that, copy the new public IP address from the EC2 interface. On the domain provider’s website, create a DNS record of type A and insert the correlated IP address of your instance into it.
Let’s Encrypt certificate generation
Connect to your instance via an SSH client (remember that your public IP address has changed. Change it in the connection settings before connecting).
First, install Certbot (a utility for generating certificates and keys) by running the following command:
sudo apt install certbotWhen the installer asks “Do you want to continue?”, press ‘y’ and ‘Enter’.
Generate a Let’s Encrypt certificate without installing it using the command:
sudo certbot certonly --standalone -d test.domain.comcertonly – only obtains or renews a certificate, but does not install it;
–standalone – starts its own web server for authentication when obtaining a certificate;
-d – Specifies a domain or a comma-separated list of domains for which you want to obtain certificates;
test.domain.com is the domain name your instance is attached to.
Next, certbot will ask a series of questions to register the certificate:
– specify the e-mail address to which notifications about the need to renew the certificate and other information will be sent.
– confirm that you have read the terms of use of the service (enter Y).
– agree or opt out of the newsletter that will be sent to the email address specified earlier (enter Y or N).
If the generation was successful, you will see a message about the creation of the certificate. The certificate files (cert.pem and privkey.pem) are stored in the /etc/letsencrypt/live/<test.domain.ru>/ directory.

Ready-made certificates must be renamed and moved to the gophish directory. Run the commands:
sudo cp /etc/letsencrypt/live/<test.domain.ru>/cert.pem /home/ubuntu/gophish/<test.domain>.crtsudo cp /etc/letsencrypt/live/<test.domain.ru>/privkey.pem /home/ubuntu/gophish/<test.domain>.key
Configuring HTTPS connection to the GoPhish admin panel and phishing domain
Enter the command:
sudo nano /home/ubuntu/gophish/conf.jsonEdit the config file as shown in the image.

Start gophish.
Go to your domain using HTTPS and the correct port.

In the future, when a phishing site is created, it will also be possible to access it via HTTPS.
